The Complete Guide to Water Level Controller
I called my previous Water level controller service provider, who installed an automatic water level controller in our old building to install it in my new building.
When I asked about the water level controller installation charge without WIRING, they told me ₹3,500.
I was shocked listening to the price.
In my previous building, the same company installed with wiring as well for ₹2,200.
This time they significantly raised the price for the same product and service. I tried to bargain with them, telling them I’m an old customer and can you please reduce the cost a little bit… they said, ok, we can do that for “₹3,200” like they said.
I asked how about “₹1,500”?
I guess he got offended by listening to my price… now he angrily answering said… NOoo.. please try any other service, and disconnected the CALL abruptly.
Ok.
I didn’t try calling any other water level controller service provider as in most cases all of them will be in the same price range so I decided to try it myself.
I decided because I know the Installation and Working principle of water level controller as it was installed in our old building. Based on this condition only I decided to go with DIY (Do It Yourself) method.
In the below article I’m going to share how you can install water level controller by yourself and save money. For me and my dad it took 3 hours to finish the installation.
Table of Contents
- Buying Guide
- Installation Steps
- How it Works
- Overhead Tank Sensor Job
- Underground Tank Sensor Job
- Installing Sensors in Overhead Tank
- Installing Sensors in Underground Tank
- Electrical Wiring
- Common Issues
- Product Used
Choosing Water Level Controller Unit
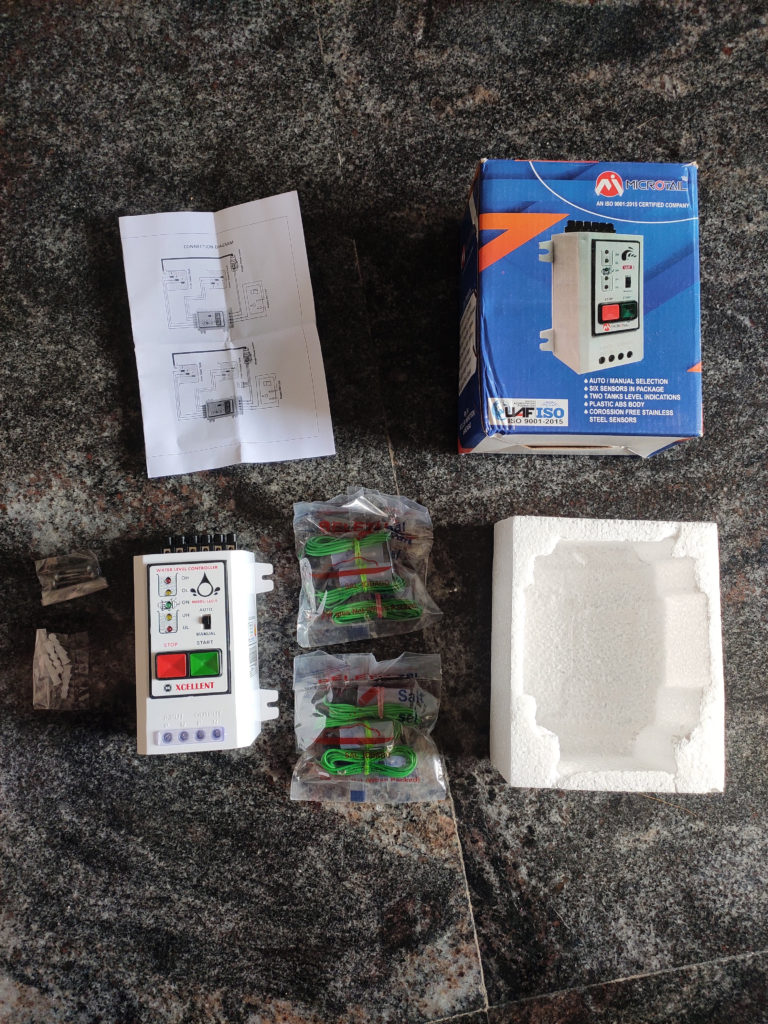
Water level controller items
Based experience of having a water level controller in our old building, I know what to look for in a water level controller.
I loved my previous controller unit, so I tried to look for similar functionality and Sensor. Of course, the controller’s price also needs to be reasonable.
After doing research, I decided to go with Microtail Fully Automatic Water Level Controller with Dry Run Protection from Amazon.in.
Tip: Never Chooose this type of Water Level Controller
Here are the things you should consider while looking for an Automatic Water Level Controller:
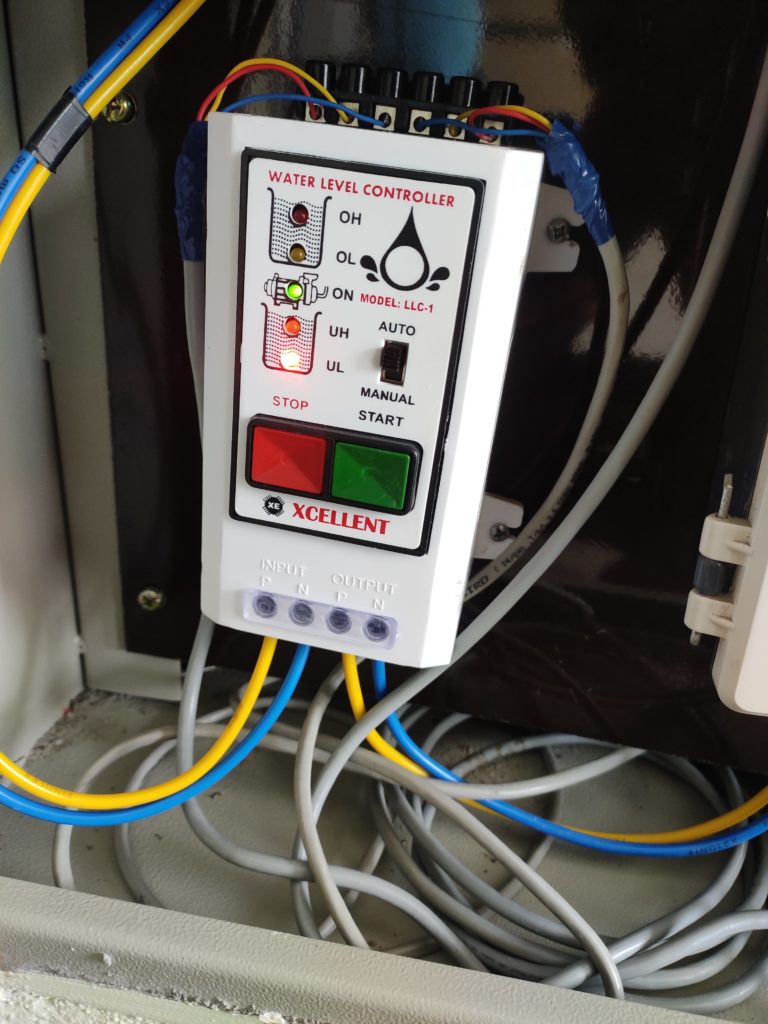
1) Does the Water level controller come with Manual mode and Auto mode?
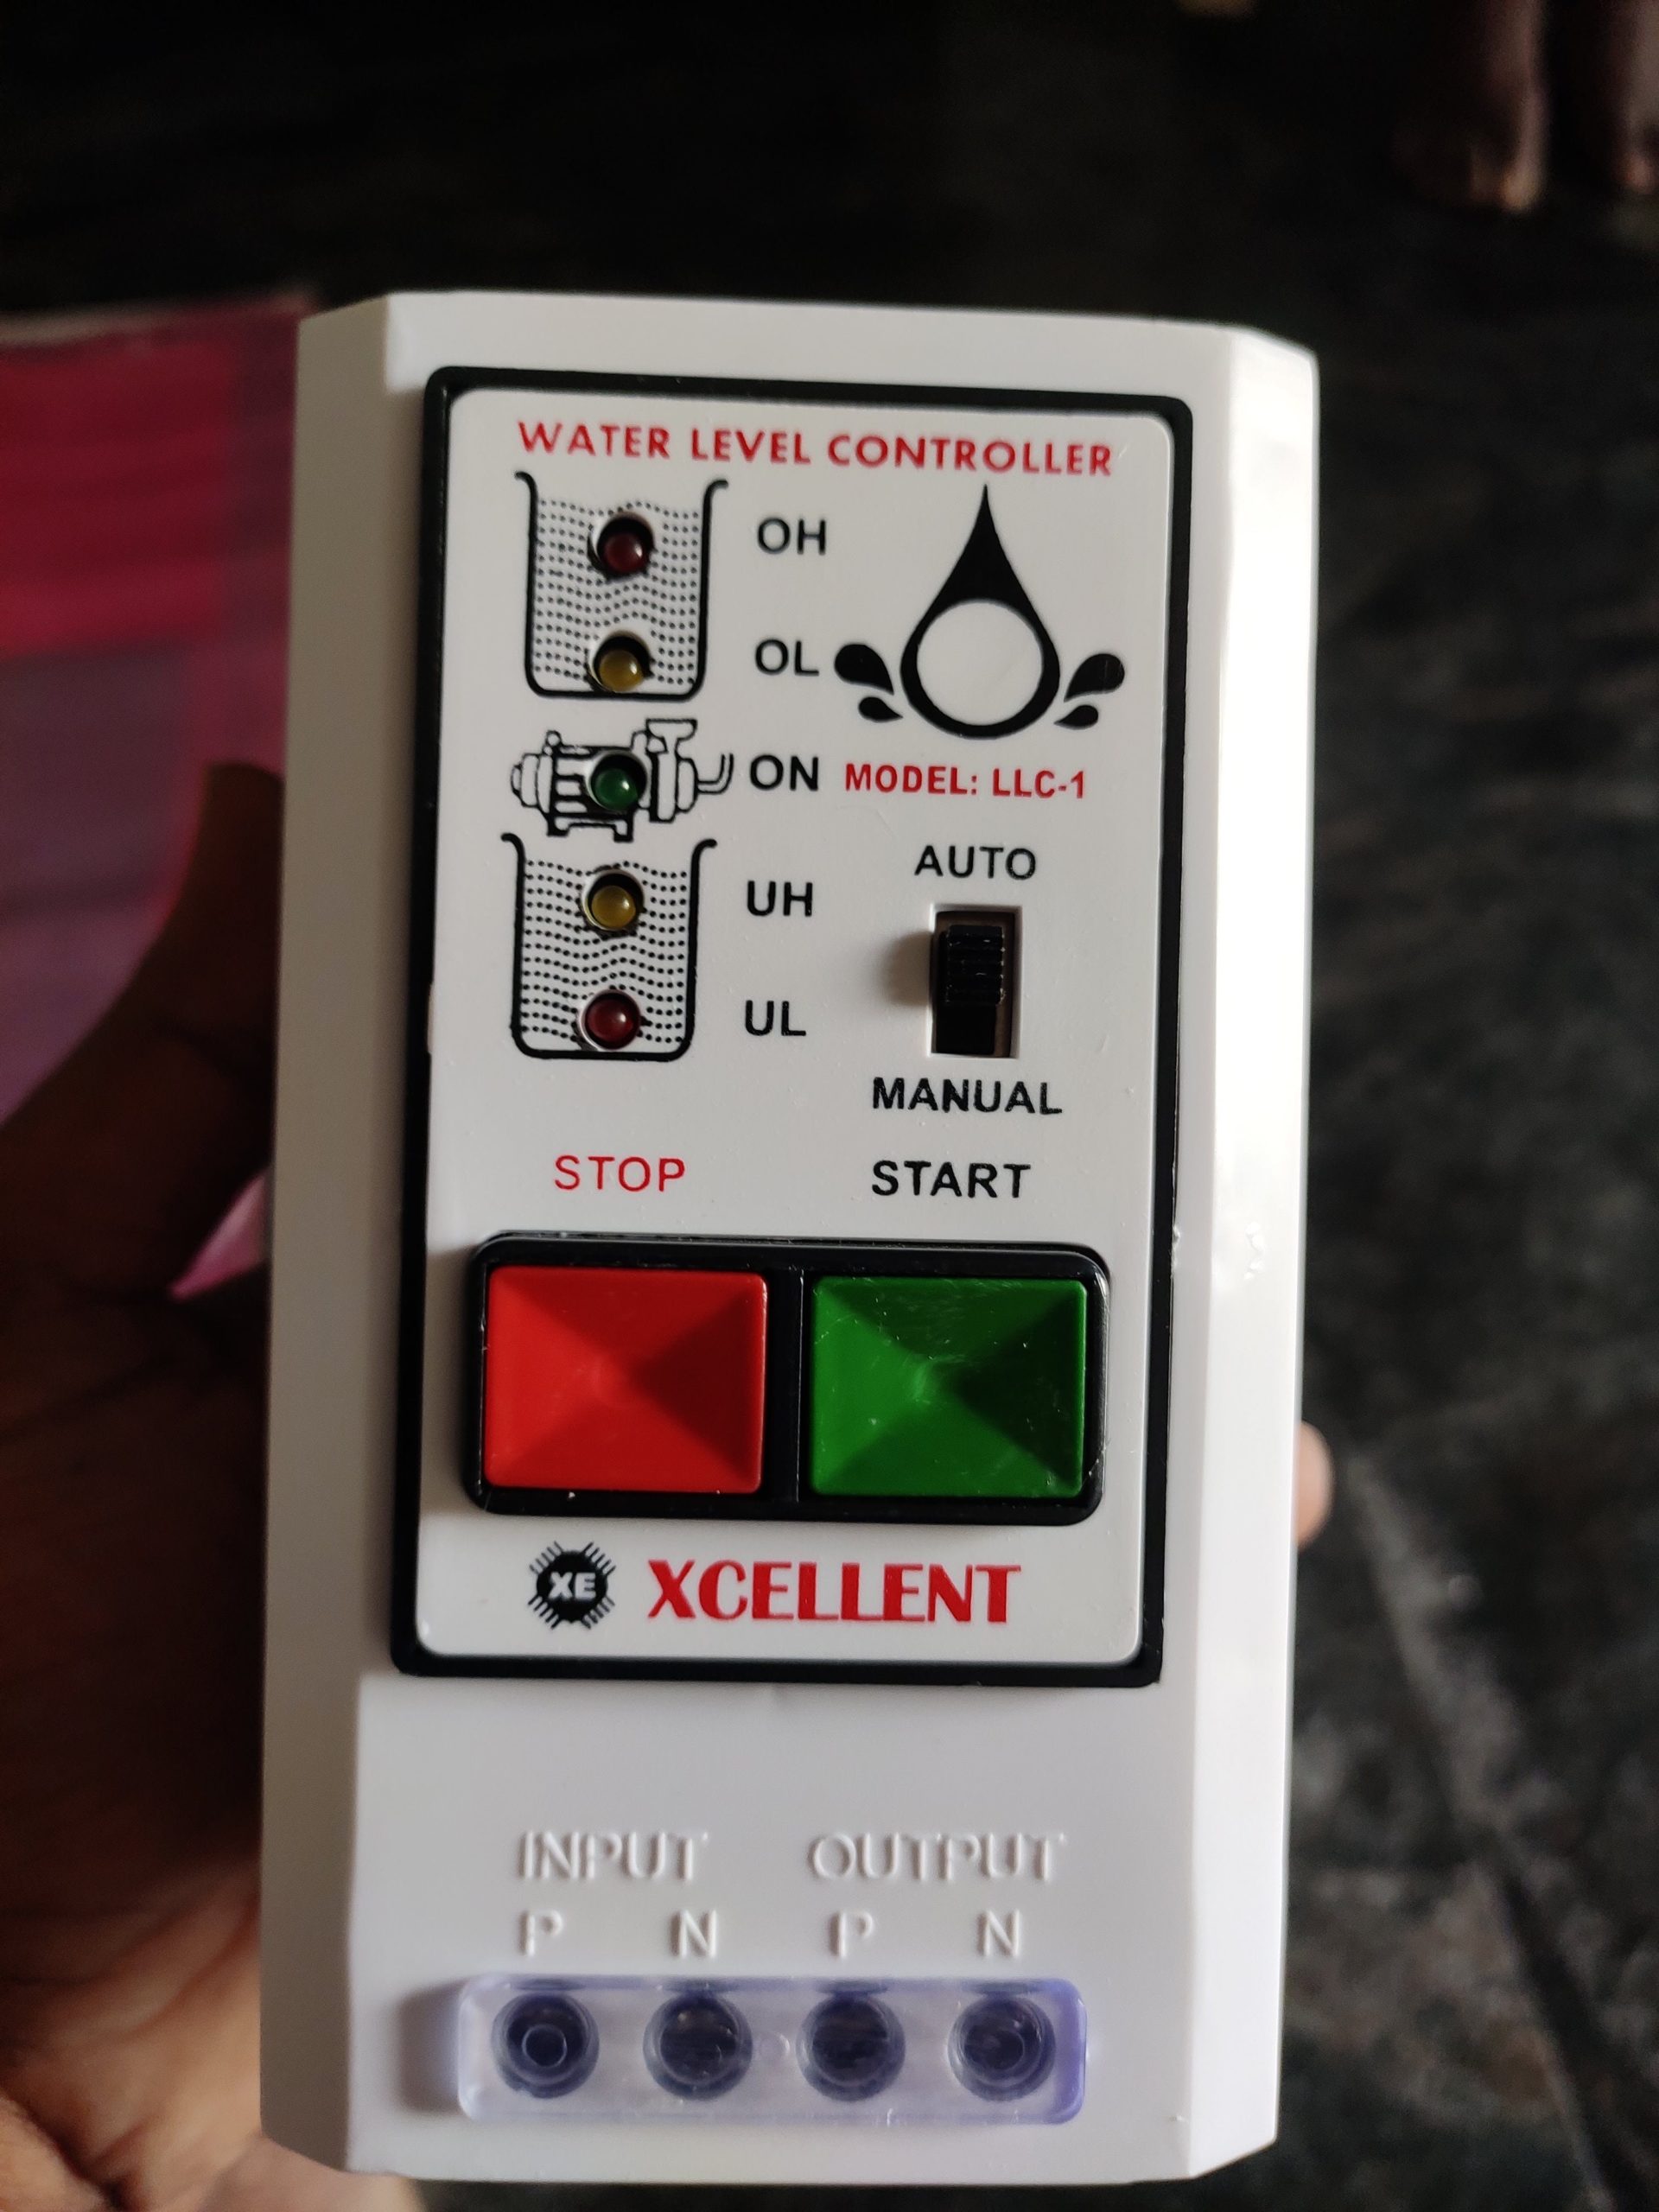
Water level controller unit with Auto and Manul mode
Sometimes you need to turn ON the Motor manually instead depending on the Sensor to turn Motor ON. For this reason, the water level controller should have a Manual and Auto mode switch should be present.
Microtail does come with manual and auto modes as well.
2) Does the water level controller come with Dry Run Protection feature?
Dry Run Protection is a safety feature to your Sump pump. What this feature does is, if the Motor is running and Water is not coming from the overhead tank, then the water level controller unit will turn OFF the Motor to prevent the Motor from damaging.
With Microtail Fully Automatic Water Level Controller with Dry Run Protection unit, dry run protection is achieved by keeping the Sensor above the sump motor level to prevent the Motor from getting ON if the water level is below the Motor.
3) Type of Sensors:
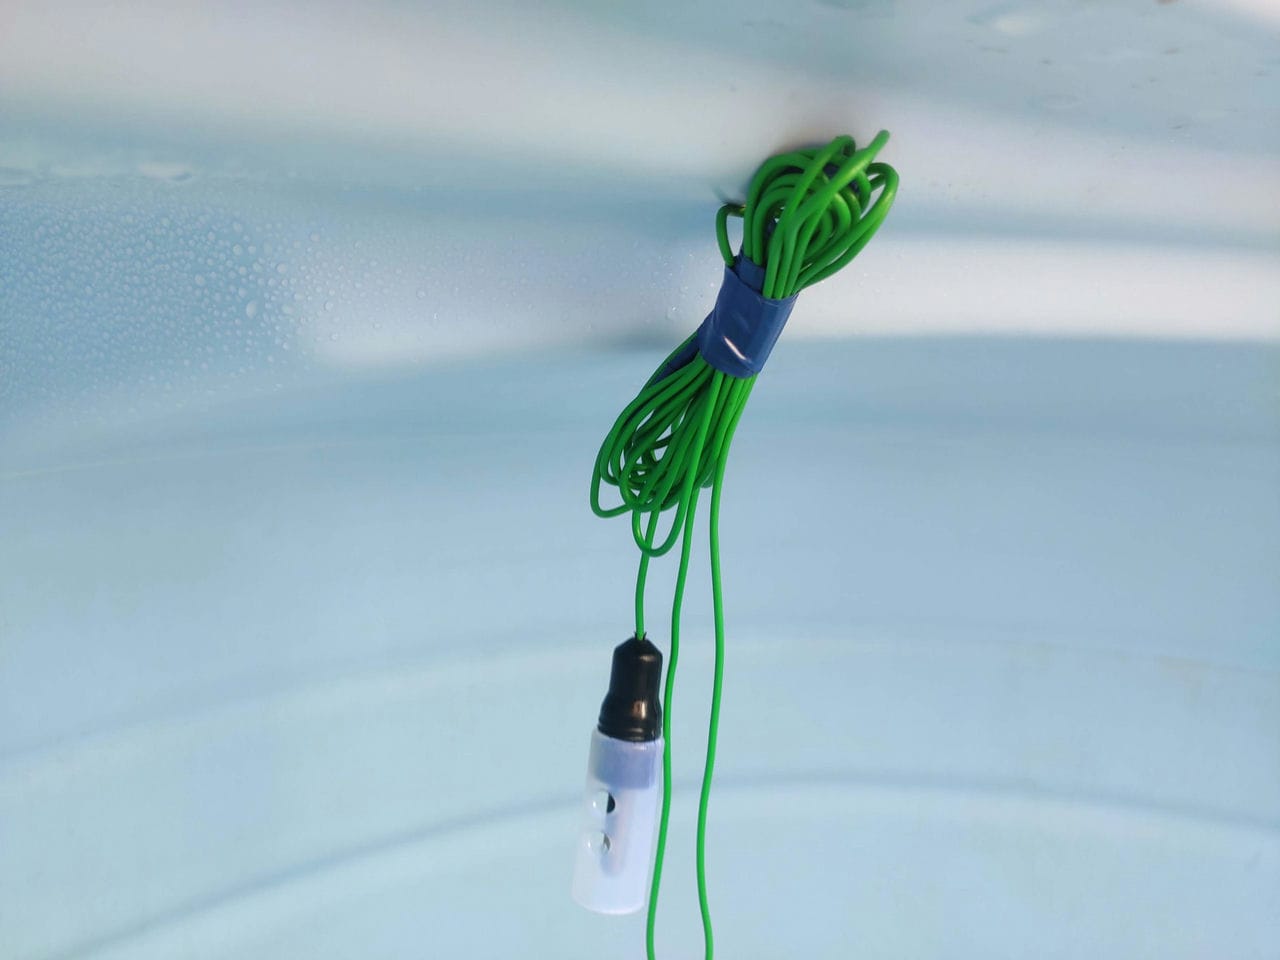
Water level controller sensor installed in overhead tank
Sensors should be of good quality because we keep sensors underwater, and they should not get damaged easily due to corrosion. Usually, sensors made of good-quality stainless steel are preferred.
4) Number of sensors:
Using a water level controller to pump Water from the sump to the overhead tank, take a minimum of 6 sensors. In the sump, we place 3 sensors and in the overhead tank we put 3 sensors.
I will explain the usage of those sensors in the Installation part.
5) Installation manual:
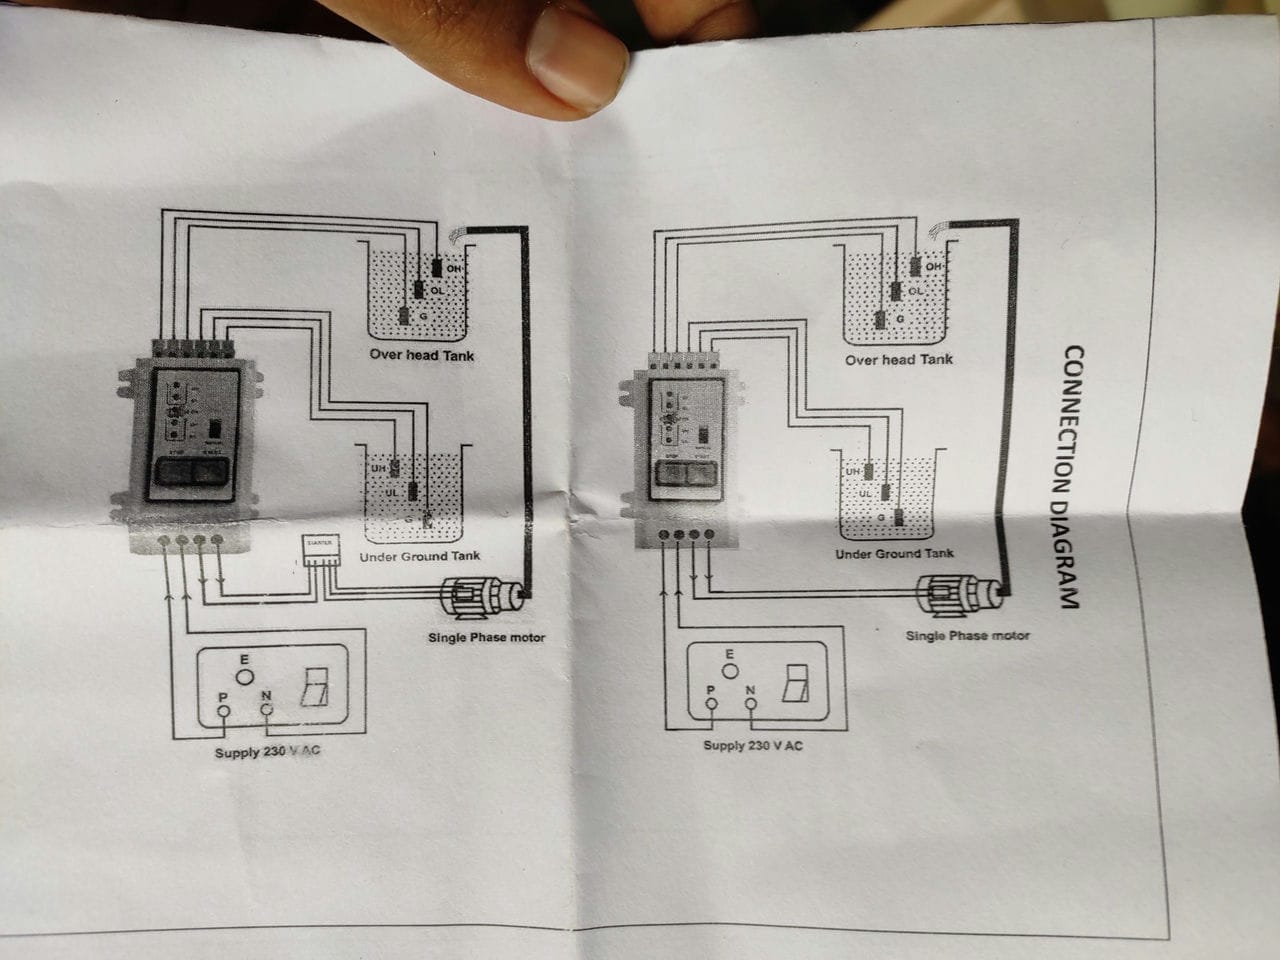
Water level controller wiring diagram
Ensure the water level controller comes with a manual so you can easily follow the guidelines mentioned in the manual for installation. Usually, a Wiring diagram is what you need in most cases.
6) Does the water level controller support your Motor?
In houses, we use below 2 HP motors to pump Water, which is what water level controllers are designed to support.
If you are planning to use Borewell to pump Water, you need to ensure the water level controller supports those capacity motors.
If you are in doubt, ask them once before you order.
7) Number of Water level indicator LED on controller:
This is not important to me, but some users may need to know how much Water there is in their sump or overhead tank. To see the water level, some controllers offer more water level status than others. The more the LEDs in the board, the more the water level you can check.
8) Should be Made in India:
This is my personal experience after buying some cheap china made electronic items before.
Usually, what happens is, due to voltage variations in India, cheap china made items won’t last in India. So make sure you buy products made in India to stand with the Indian voltage system.
9) Warranty:
If they have a warranty, then it’s good. If they don’t have, don’t stress much. We are not buying some super costly item to deal with warranty.
10) Support?:
If they offer some support, it will be helpful if you get stuck with installation. Check if they have any contact details to contact if you need any help.
Installation of Water Level Controller Unit:
I will use Microtail Fully Automatic Water Level Controller in this guide with a Dry Run Protection unit. If you bought any other company water level controller, most of the concepts explained in this guide will be the same, but for wiring, you need to refer to your device manual.
In this guide, I assume you will have an underground tank and Overhead tank where you will be pumping Water from the under-ground tank to the over-head tank.
To pump Water you will use a single-phase motor. I hope you have already done the wiring for your pump.
To install a water level controller, a few things you need.
1) Need to run water level controller cable from pump switch to overhead tank
2) run the water controller wire from the pump switch to the underground tank
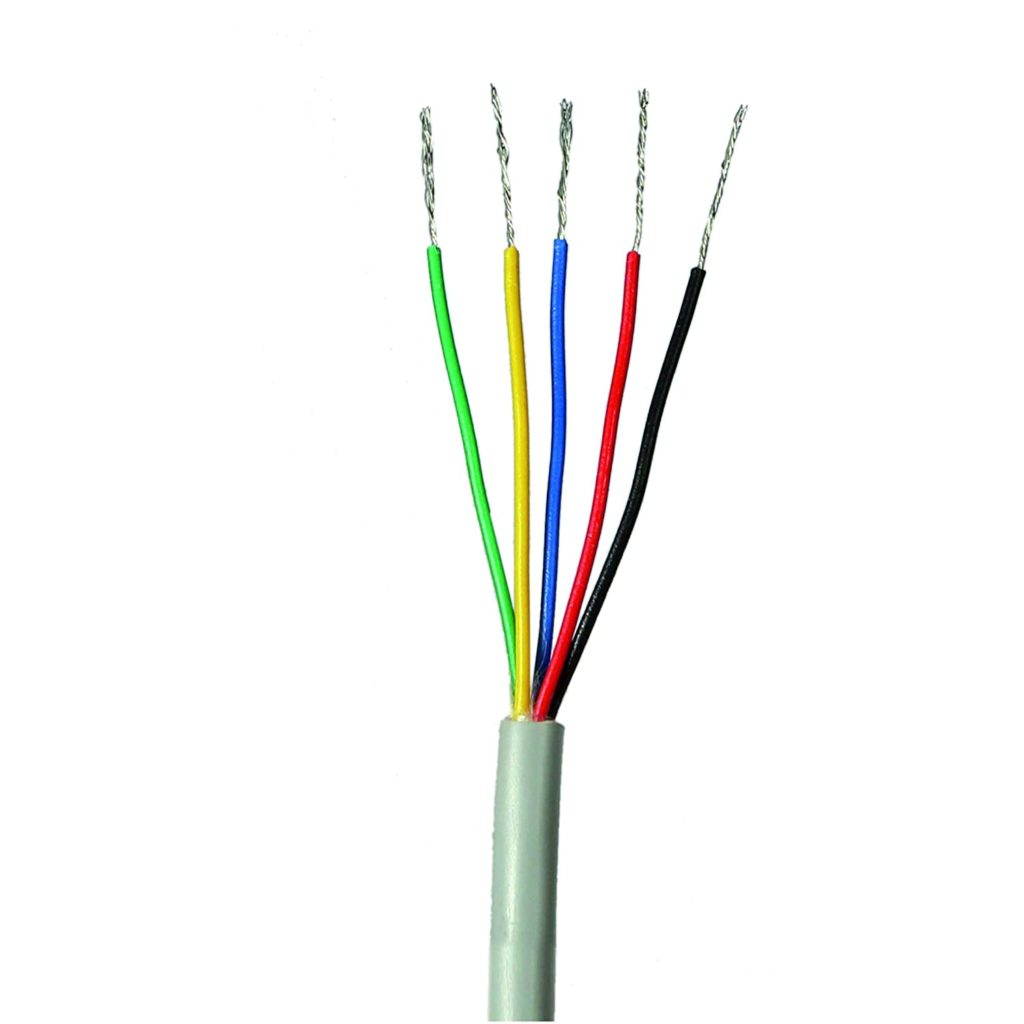
Water controller wire
Water controller cables usually have 5 wires (5 core cable) in each cable. In this model water controller, we only need 3 wires, so the other 2 wires will be a dummy.
Choose any 3 color wires in your cable. I picked Red, Yellow, and Blue (RYB) color wire and cut the remaining 2 wires if you have extra.
Installing a water level controller is not rocket science once you understand how it works. It could take a few of your work but not complicated as we usually think.
Our water level controller has 6 sensors—3 for the overhead tank and 3 for the underground tank.
Let’s first understand what that sensor job is.
How Does Water Level Controller Work
How Does Water Level Controller Work
Overhead Tank Sensors Job:
1st Senor: (Bottom of the Tank; G - Ground Level, Blue color wire)
In the overhead tank, we will keep 1 sensor 1" above the bottom of the tank. This Sensor’s job is to indicate when Water in the overhead tank is empty.
I used Blue color wire.
2nd Sensor: (Middle of the Tank; OL - Overhead Low, Yellow color wire)
The second Sensor acts like a trigger to switch ON the Motor. If the water level goes below this Sensor, then Sensor will switch ON the Motor to fill the Water in the overhead tank.
We usually place 2nd Sensor in the middle of the tank, so when the Water is below the half tank, the Sensor will switch on the Motor.
I used Yellow color wire.
3rd Sensor: (Top of the Tank; OH - Overhead Heigh, Red color wire)
3rd Sensor’s job is to tell the Motor that the Water is full now and immediately switch off the Motor.
3rd Sensor we usually place at the top (6" below the tank cover) of the water tank. When the Water reaches the top Sensor, 3rd Sensor will tell the water level controller to switch off the water motor.
I used Red color wire.
Now let’s move to Under ground tank.
Under Ground Tank Sensor Job:
1st Sensor: (Bottom of the Tank - Below the Motor; G - Ground Level, Blue color wire):
Keep sensor below the Motor level.
In this model water level controller, this Sensor should always be dipped inside the water. You should keep this sensor below the motor level so sensor is always touching water.
I used Blue color wire.
2nd Sensor: (Middle of the Tank - For Dry run potection; UL - Underground Low, Yellow color wire):
This sensor should kept above the motor level. I recommend keeping atleast 1 feet above the motor level.
When water is not touching this sensor, then water level controller unit won’t turn on motor. This sensor sensor is designed to inform low water level and prevents turning on water motor to prevent dry run.
So if water is not touching the sensor, then water level controller won’t turn on motor in Auto mode.
If you need to turn on water pump, then you need to switch to manual mode to switch on the pump.
I used Yellow color wire.
3rd Sensor: (Top of the Tank - Just for Sump is Full Water Level Indicator; UH - Underground Heigh, Red color wire):
Same as 2nd Sensor. This Sensor doesn’t do much besides indicating the water level is full in the sump tank. Place this Sensor where the water level controller needs to indicate in the led on the board (UH LED).
I used Red color wire.
Connect all Sensors to automatic water level conroller unit as per your wiring diagram, and your job is done.
Installing Sensors in Overhead Tank:
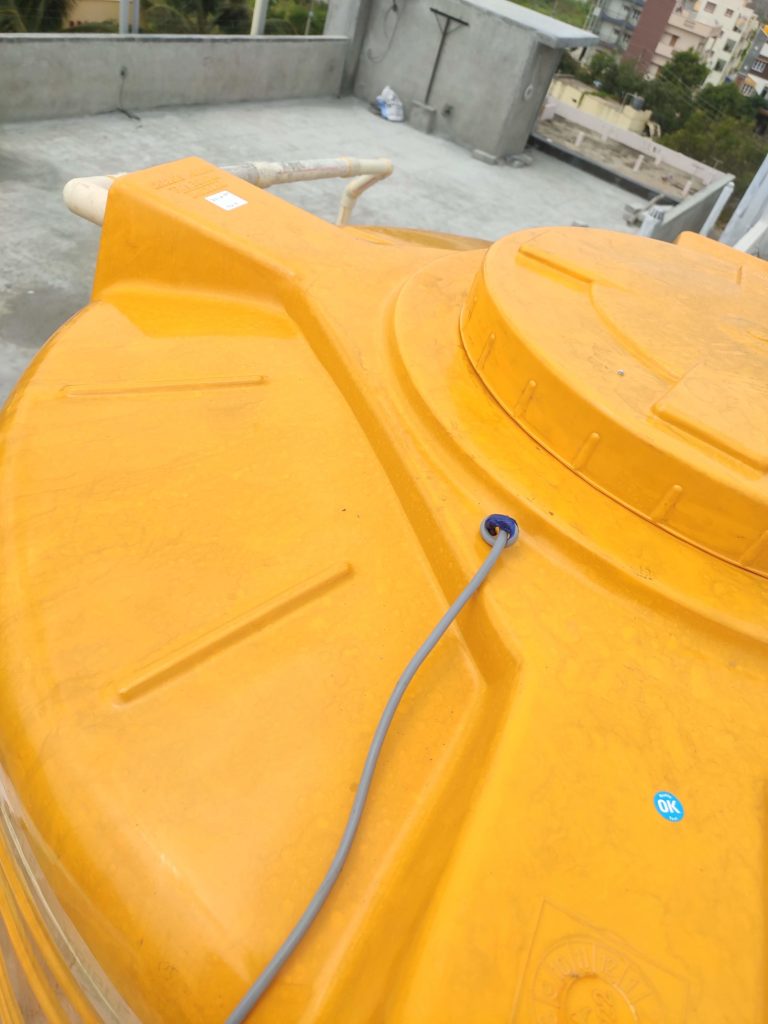
- Make a hole in the overhead tank to insert the sensor cable. I did this when the plumbers shifted our water tank to the terrace itself because, at that time, the Plumbers will have a drilling machine. If you ask them, they will do it for you.
Things to keep in mind:
a) Make sure you do this in your primary tank if you have multiple water tanks.
b) Keep sensors a little far from the water delivery point to prevent water directly dropping on sensors which will create a sensor to confusion
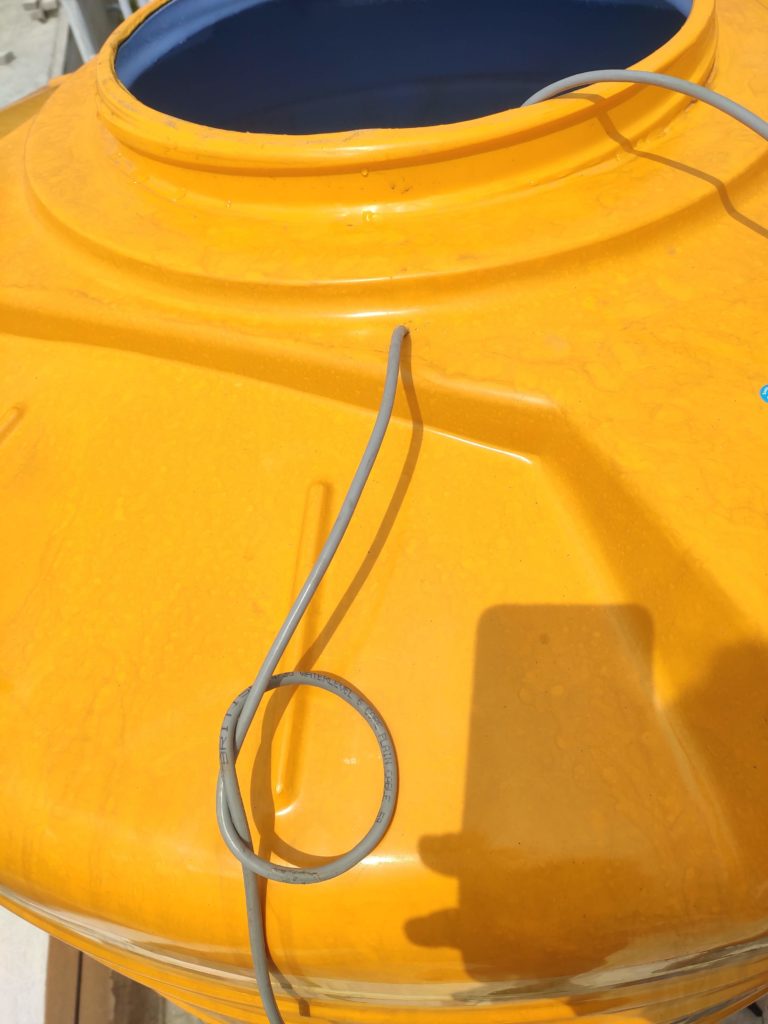
Sensor cable installed in overhead tank
- Keep one knot outside the tank to prevent water controller cable from changing it’s length. Because inside the tank sensor will be there so.
Knot in overhead tank
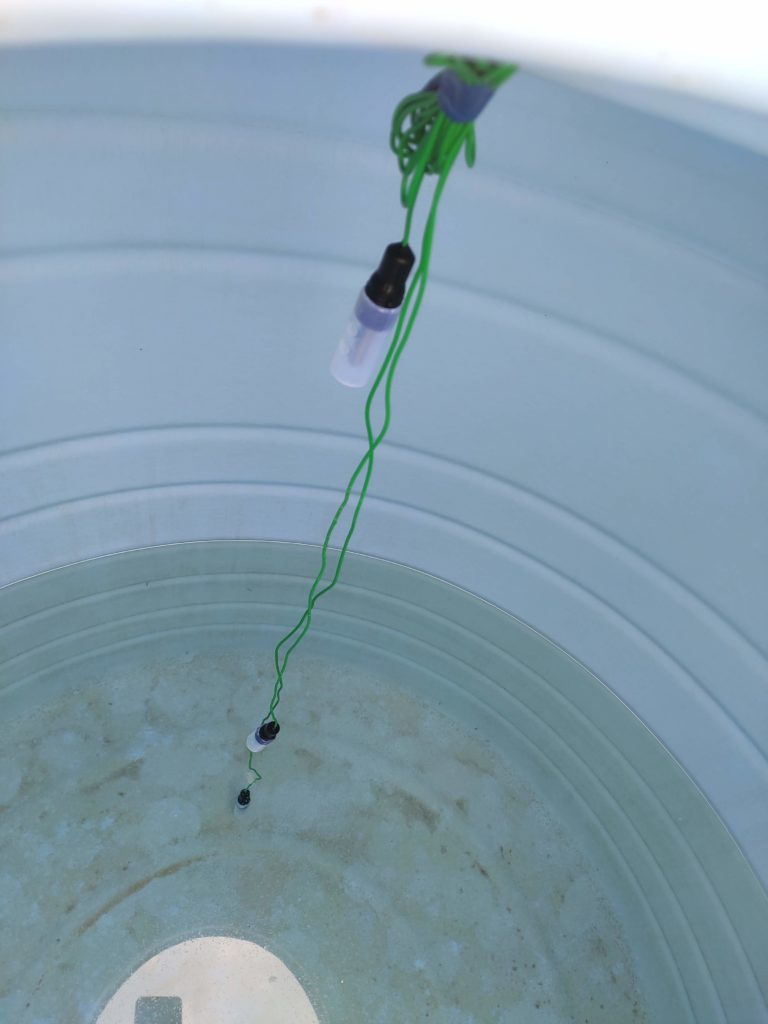
water level controller sensors in overhead tank
Installing Sensors in Underground Tank:
Similar to overhead tank you need to install sensors in Undergrond tank.
Keep all 3 sensors at whatever desired level you need to place and tie that cable at top of the underground tank.
Electrical Wire Connection:
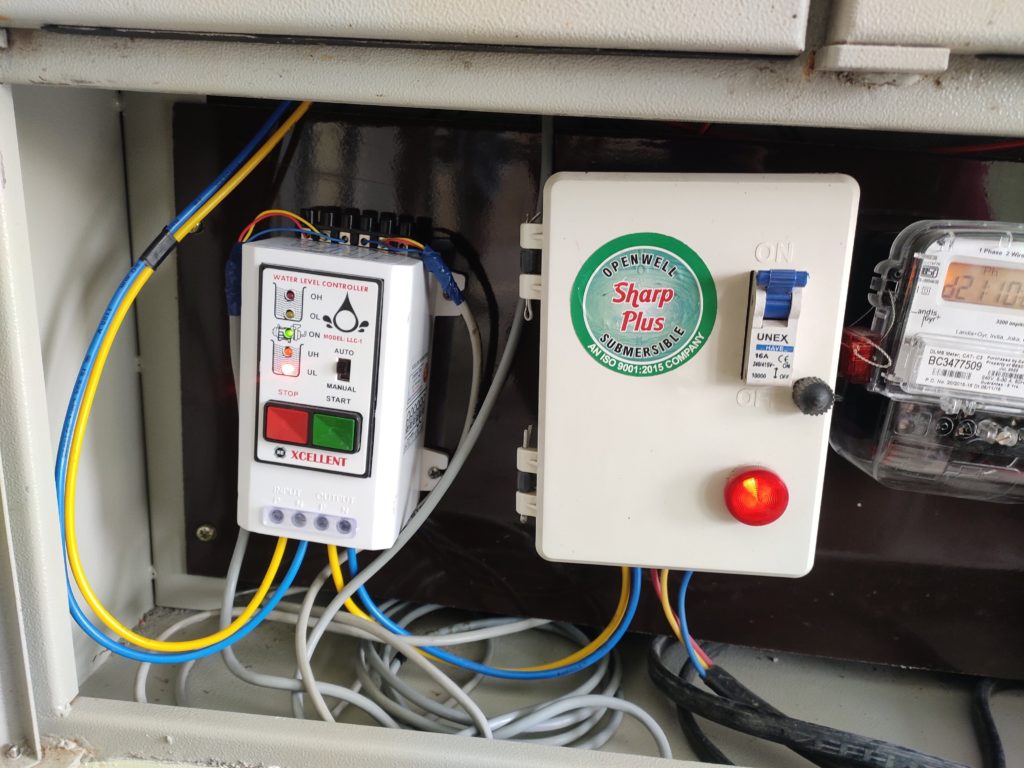
Water controller with motor starter electrical wiring
To connect sensor wires in controller unit I connected From left to right, Red, Yellow, Blue, Blue, Yellow, Red.
On the bottom of sensor unit in Input section we give Power and on the Output section we give connection to pump input.
The remaining electrical wiring is self explanatory. If you don’t understand electrical wiring, ask your electrician help giving a wiring diagram. They will do that part in few minutes.
Water Level Controller Common Issues:
-
If you installed a brand new water level controller and it’s not working as it should, it’s probably an installation mistake. Make sure to properly read and understand the working principle and double-check sensor connections to make sure it’s all correct
-
If the Auto sensor is not working after a few days, ensure sensors are clean and check wire joints. Especially if wire joints are inside water. Usually, if water enters inside the tape, the joint will corrode and connectivity stops. Hence, sensors will stop working
-
Is manual mode working, but auto mode is not working? Mostly, it’s not a controller issue. It’s something to do with sensors. Read point no 2.
-
The water level controller randomly stops working. If this is the case, your controller unit mostly goes to Dry Run protection mode, so it stops working when the water level in the sump gets low. Check and adjust sensors properly.
-
Sometimes the motor doesn’t Start? Possibly, the controller unit going into Dry Run protection mode. Adjust sensors properly.
Product Used:
Microtail Fully Automatic Water Level Controller with Dry Run Protection